Squarespace SEO Checklist for Complete Beginners
You’ve spent hours DIYing your website, from curating your portfolio to choosing the perfect fonts and layout. You finally click “Publish” on your new Squarespace website, and then… crickets. Your website is beautiful, but gorgeous design alone isn’t going to get your business seen.
This is where Search Engine Optimization (SEO) comes in. Adding SEO is the process of optimizing your website so that search engines like Google, Bing, and Yahoo can find, read, interpret, and rank your content. Basically, it acts as a digital roadmap for search engines. When a potential client types a phrase into Google, search algorithms look at billions of pages to find and deliver the most relevant answer. If your website isn't optimized, those algorithms will pass you by.
Thankfully, adding SEO to your website isn’t overly complicated once you know where to find the right toggles, text boxes, and settings within the Squarespace interface. Here is a comprehensive, step-by-step guide on how to add SEO to your website from scratch.

1. Rename Your Images Before Uploading
Renaming your photos before uploading them to your asset library may seem tedious, but it is one of the most vital ways to insert SEO-rich keywords into your website that are relevant.
Why File Names Matter to Google
Think about it like this: search engines are highly intelligent, but they cannot "see" an image the way a human eye does. They rely entirely on textual metadata, aka file name and alt text, to decipher visual content. If your image file is named something generic like IMG_123.jpg or ScreenShot_v2.png, Google reads this text and learns absolutely nothing about the image, and as a result, nothing about your business.
On the other hand, if you name your image file something descriptive and accurate like modern-boho-wedding-invitations.jpg, search engine bots can instantly categorize this image. This won’t just help you get seen by people searching for wedding invitations with a modern boho style, but it will also help your chances of ranking higher in Google images which is another way to drive traffic to your website.
Rookie Mistake: Renaming Photos Inside of Squarespace
A lot of beginners and business owners DIYing their own websites make the mistake of uploading their images with generic file names, and then using the Alternate Filename option to rename them. It’s highly recommended not to do this.
If you only rename the images inside Squarespace's user interface, the underlying file name on Squarespace's static servers retains its original raw name (for example, IMG_123.jpg) in the image URL path. Because search engines are looking at this URL path to understand the image source, renaming the image only inside of Squarespace does nothing for the SEO.
Best Practices for File Naming
Before uploading any images to Squarespace, it is important to rename photos using these golden rules:
Use All Lowercase Letters: Search engines can get confused by random capitalization, so it’s best to keep all words lowercase.
Replace Spaces with Hyphens: Never leave spaces between words. Search engines read hyphens (-) as spaces, whereas underscores (_) glue words together. For example, brown-leather-shoes means "brown leather shoes," but brown_leather_shoes reads as “brownleathershoes”.
Remove Filler Words: Take out words like "a," "the," "and," or "of." It’s best to just use keywords even if it doesn’t form a complete sentence.
Example - Confusing vs. Clear Image File Name:
Confusing: /DC_1920_wedding%20photo.jpg
Clear: /intimate-barn-wedding-reception-decor.jpg
2. Fill in Alt Text for Your Images
Alternative text, or alt text, serves a dual purpose: it provides a textual description of an image for search engine indexing, and it serves as the foundational pillar for web accessibility.
Accessibility vs. SEO
Alt text is read aloud by assistive screen readers utilized by the millions of individuals worldwide who live with visual impairments. If your alt text is missing or poorly written, you exclude these users from experiencing your website. Luckily, writing good alt text also lines up with what search engines need to properly read and interpret image alt text.
Common Alt Text Mistakes to Avoid
Website owners often hurt their SEO rankings with alt text by making one or both of these mistakes:
Keyword Stuffing and Using Fragmented Sentences: Unlike image file names, you actually want the alt text to be a fully formed sentence. If it’s not, search engines will interpret the alt text as spam.
Keyword Stuffed: wedding ring jewelry gold modern engagement bands bride
Accessible & Optimized: A modern gold wedding ring set resting on a champagne-colored velvet ring tray.
Broad or Vague Descriptions: When you use a broad description, you miss out on the opportunity to increase your ranking with industry and location-specific keywords.
Too Broad: A bride and groom laughing.
Specific & Local: A bride and groom laughing together during an outdoor sunset ceremony at a rustic ranch wedding venue in Austin, Texas.
How to Edit Alt Text Across Different Squarespace Sections
The method for adding alt text depends on the type of element you are using in Squarespace 7.1 (Fluid Engine):
For Standard Image Blocks:
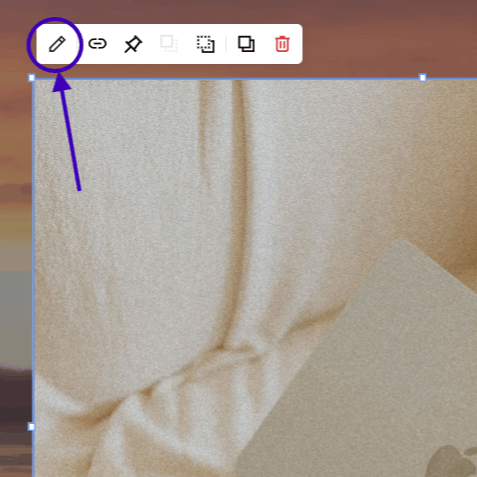
Click on the image block and click the Pencil Icon to open the settings menu.
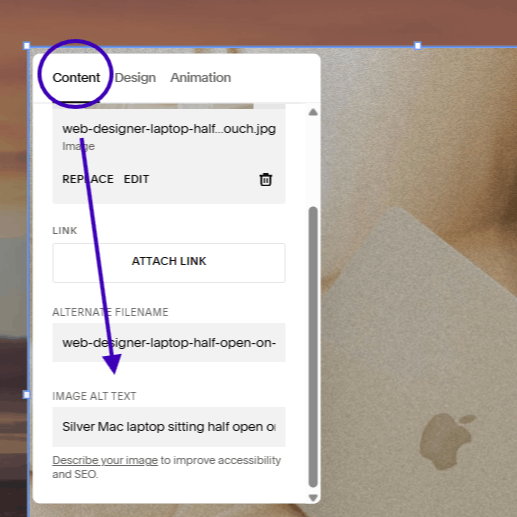
Navigate to the Content tab.
Locate the Alt Text field.
Type your descriptive sentence and click save.
For Gallery Sections:
Hover over the gallery section and click Edit Gallery.
Click the image thumbnail you wish to edit.
Type your description directly into the Description text field (Squarespace automatically maps this specific field as HTML alt text for gallery images).
For Product Images:
Open your product catalog and double-click the item (or click the Three Dots icon).
Hover over the specific product image and click the Three Dots icon.
Select Edit Metadata, fill in the alt text field, and hit apply.
Pro Tip: When you feel stuck writing descriptions, close your eyes and pretend you are describing the photo to a friend over a phone call. Write exactly what you would say out loud. If it makes sense, weave in your specific industry, niche, or target city at the end.
3. Assign a Unique SEO Title and Description for Each Page
Your site description is the summary that displays on a Search Engine Results Page (SERP). It’s made up of two distinct components: the clickable blue page title, aka your SEO Title, and the short blurb of descriptive text beneath it. Together this is called a snippet.
The Psychology of the SERP Snippet
While your meta titles and descriptions do not directly improve your SEO rankings, they do heavily impact your Click-Through Rate (CTR). CTR is the rate of how many people click on your site in search results. If your description is boring, cut-off, or irrelevant, visitors will skip over your link, even if you’re at the top of the search results. On the other hand, an interesting snippet can convince people to click on your website instead of competitors’ sites that are ranking higher than you.
Every single page on your website requires a unique title and description. If you copy and paste the exact same meta text from your Home page, to your About page, Contact page, etc., search engines will struggle to understand which page is the best fit or answer to a person’s search.
Step-by-Step Implementation Guide
To customize the SEO snippet for individual pages in Squarespace:
Navigate to the Pages menu from your main dashboard.
Scroll to find the specific page you want to update.
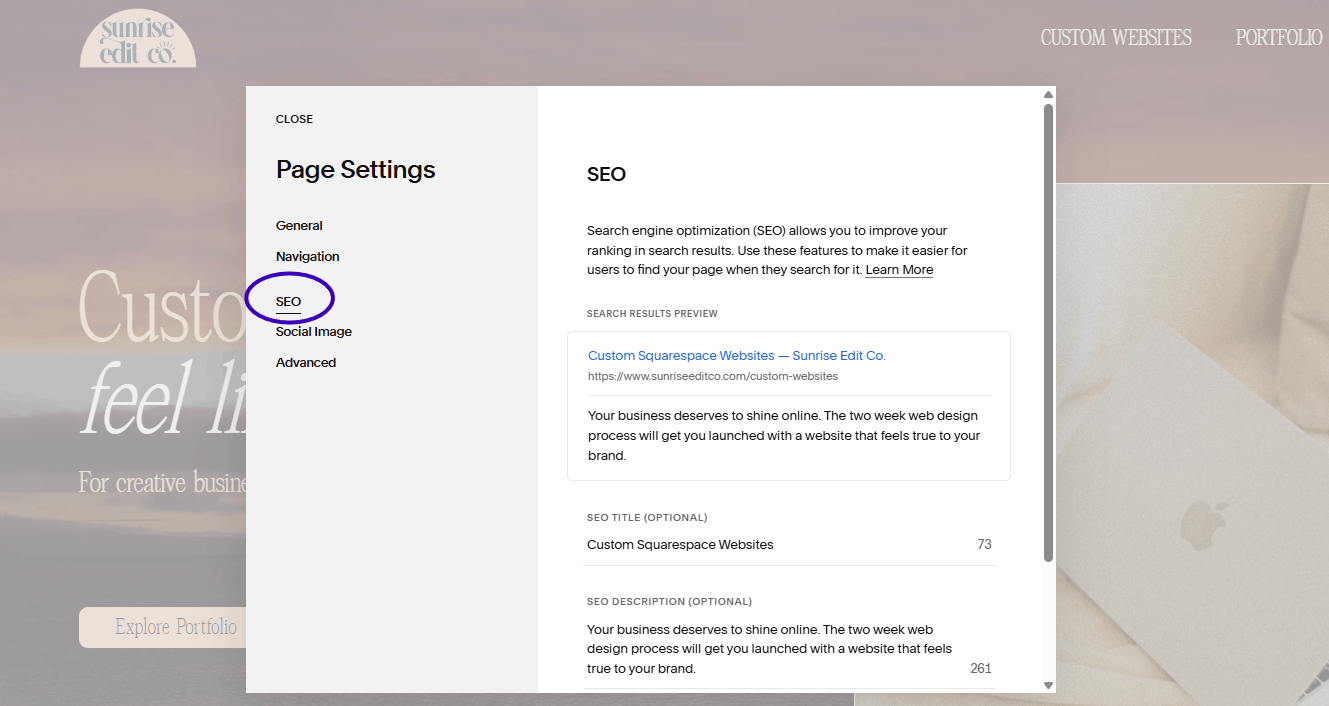
Click the Gear Icon directly to the right of the page title to access Page Settings.
Select the SEO tab from the left sidebar panel.
Fill out the SEO Title and SEO Description text boxes.
Look at the live search result preview displayed at the top of the menu to verify formatting.
Click the Save button in the top left corner.
Length and Formatting Guidelines
Although Squarespace allows for flexibility in title and description length, there is a sweet spot you should strive to hit. It’s important to stay in this range when possible so your description doesn’t get cut off with the dreaded ellipses (...).
SEO Titles (50–60 Characters): Use a clean format such as Primary Keyword | Business Name or Page Title — Location Business Name. Your SEO title also shows up as the text title on browser tabs.
SEO Descriptions (120–150 Characters): Write an active, compelling sentence that ends with a clear call-to-action (CTA). Use keywords in a way that makes sense and summarizes your page, instead of just randomly stuffing them back-to-back.
4. Hide Pages from Search Results That Offer No Organic Value
Part of having a website is having control over your user’s experience. You get to curate exactly which pages you want visitors to be able to find, and more importantly, which ones to hide. Hiding certain pages like back-end admin pages, private pages, and pages that you’re currently changing is a powerful way to ensure that search engines only find and show your highest-converting content.
Pages You Should Hide Right Now
You should proactively hide pages that contain sensitive, personal, or duplicate text content:
Private Client Portals & Proposals: Protect your clients' privacy and proprietary project onboarding files from showing up in public searches.
Lead Magnets & Opt-in Deliverables: If your free downloadable PDF guide page or paid resources are visible in search, users can find it via Google without ever inputting their email addresses on your signup page, or without ever paying for them.
Post-Purchase "Thank You" Pages: If a user finds and clicks on your checkout page or form submission page through search, it will skew your conversion data, making your analytics inaccurate.
Under-Construction Draft Pages: Prevent users from seeing broken layouts, half-written pages, or placeholder copy while you update or change your website.
Legal Policies: Privacy Policies and Terms of Service are legally required, but they’re unnecessary to include for search results. It’s better to hide them so they don’t compete with the rest of your website.
Step-by-Step Guide to Hiding Pages
Open the Pages sidebar panel.
Locate your target page and click its Gear Icon to launch settings.
Select the SEO tab.
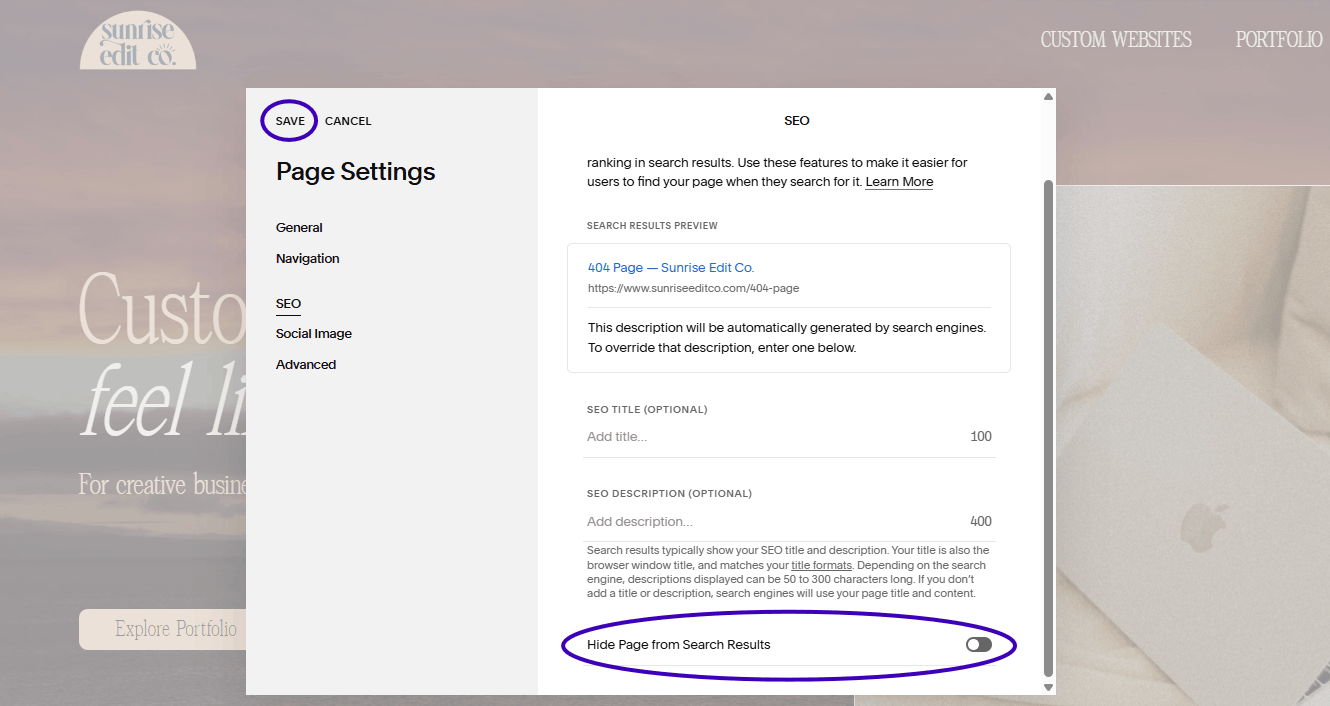
Scroll to the bottom of the page menu to locate the toggle labeled Hide Page from Search Results.
Switch the toggle on.
Click Save.
A Quick Note on Website Internal Search
It’s important to note that toggling off "Hide Page from Search Results" only blocks external index engines like Google or DuckDuckGo. It does not hide that page from your website's internal native search bar block. If you want a page completely hidden from people searching internally on your site as well, you can drag the page down into the Not Linked section of your Pages panel, toggle off the ‘Enable Page’ option on the page’s General settings tab, or add a secure password lock under the page's General settings tab.
The 404 Error Page Strategy
Many SEO checklists suggest hiding your 404 error page. However, Squarespace natively manages the 404 system page at the server level, which means it’s automatically hidden from search engines without having to change any settings.
Alternatively, the 404 page is a great place to recover traffic that would otherwise be lost. Most people will be inclined to leave your site if they run into a broken link, and Squarespace doesn’t make this any better with the generic, text-based error page they have as default. Fortunately, there’s a way around using the uninspiring 404 page Squarespace provides.
How to Build an SEO-Saving 404 Page:
Create a brand new blank page in your Not Linked section and name it "404 Page".
Add an engaging headline (e.g., "Oops! That page seems to have wandered off.").
Add a clear search bar block or direct links to your top three most popular blog posts or high-converting pages.
Go to Settings > System > 404 Page.
Select your newly created page from the dropdown menu and click save.
By implementing this adjustment, you have a much better chance of retaining your site visitors and as a result, that will signal to search engines that your site is highly interactive.
5. Double-Check Progress in the Squarespace SEO Dashboard
By going to Website > SEO / AI Visibility in the left-hand navigation panel, you can check your progress on your SEO items. On this dashboard, Squarespace will give you a completion percentage, and let you know how many pages still need SEO title and description and how many images still need alt text.
From this dashboard, you can also edit your home page SEO title and description. To find this, click on ‘SEO Settings’ in the top right-hand corner. Additionally, you can edit the SEO Title Format for your general pages and for your item pages, if you sell products.
6. Connecting Google Search Console
Optimizing your images, text snippets, and site visibility settings inside Squarespace is only half the battle. To officially launch your SEO strategy, you must connect your website to Google Search Console (GSC). This is a free tool that acts as a direct line of communication between your website and Google's indexing team.
Why Google Search Console is Essential
Without GSC, you won’t know what’s working and what’s not working with your SEO. Google Search Console tells you exactly:
Which specific search terms and phrases people type to find your website.
Your average position ranking on search results pages for specific keywords.
Exactly which pages Google has successfully indexed, and which ones have errors.
Click-Through Rates across different devices and geographical locations.
Step-by-Step Connection Tutorial
Squarespace features a native API integration that makes connecting your site to Google Search Console easy, with no manual HTML code injection required.
Make sure you are logged into the specific Google account (Gmail) you want associated with your business SEO tracking.
From your Squarespace home dashboard, click Settings > Third Party Tools > Connected Accounts.
Click the Connect Account button.
Select Google Search Console from the grid of options.
A secure pop-up window will ask for permissions. Select your Google account and click Allow.
Squarespace will automatically communicate with Google, verify your site ownership via background DNS logs, and set up your tracking property.
Submitting Your Sitemap
Once your account is linked, you must submit your website's sitemap. A sitemap is an organized XML file containing the clean, structural blueprint of every public page, post, and image on your site. Submitting it forces Google to crawl your new website immediately rather than waiting weeks for an automated crawler to find you organically.
Thankfully, Squarespace builds and dynamically updates your sitemap automatically. Your sitemap URL path is always your exact domain name followed by sitemap.xml.
How to Submit to Google:
Enter your domain name to verify if necessary.
Look at the left-hand navigation sidebar and click on Sitemaps (under the "Indexing" section).
Locate the text field labeled Add a new sitemap.
The field will pre-populate your verified domain name. In the empty text box, type exactly: sitemap.xml
Click Submit.
Initially, you will see a status indicator that says "Pending." Within 24 to 48 hours, this status text will shift to a successful bright green "Success" notification. This means Google has successfully processed your website blueprint and added your pages to the global crawling queue.
That’s it for the complete Squarespace SEO guide from scratch. If after all that, you’re thinking you’d rather have someone take care of this for you, basic SEO setup is included in my signature two week custom website package. Click below for the details!